The previous post was about training a Turi Create model with source imagery to use for CoreML and Vision frameworks. Now that we have our trained model, let’s integrate with Xcode to create a sample iOS object detection app.
My goal here is to load the trained model into Xcode and use it for object detection with both photos and live video streams.
Table of contents
Jumping into Xcode
Now that we have our CoreML model, we simply drag it into our project and when clicked on in the Navigator, we get something similar to the image below
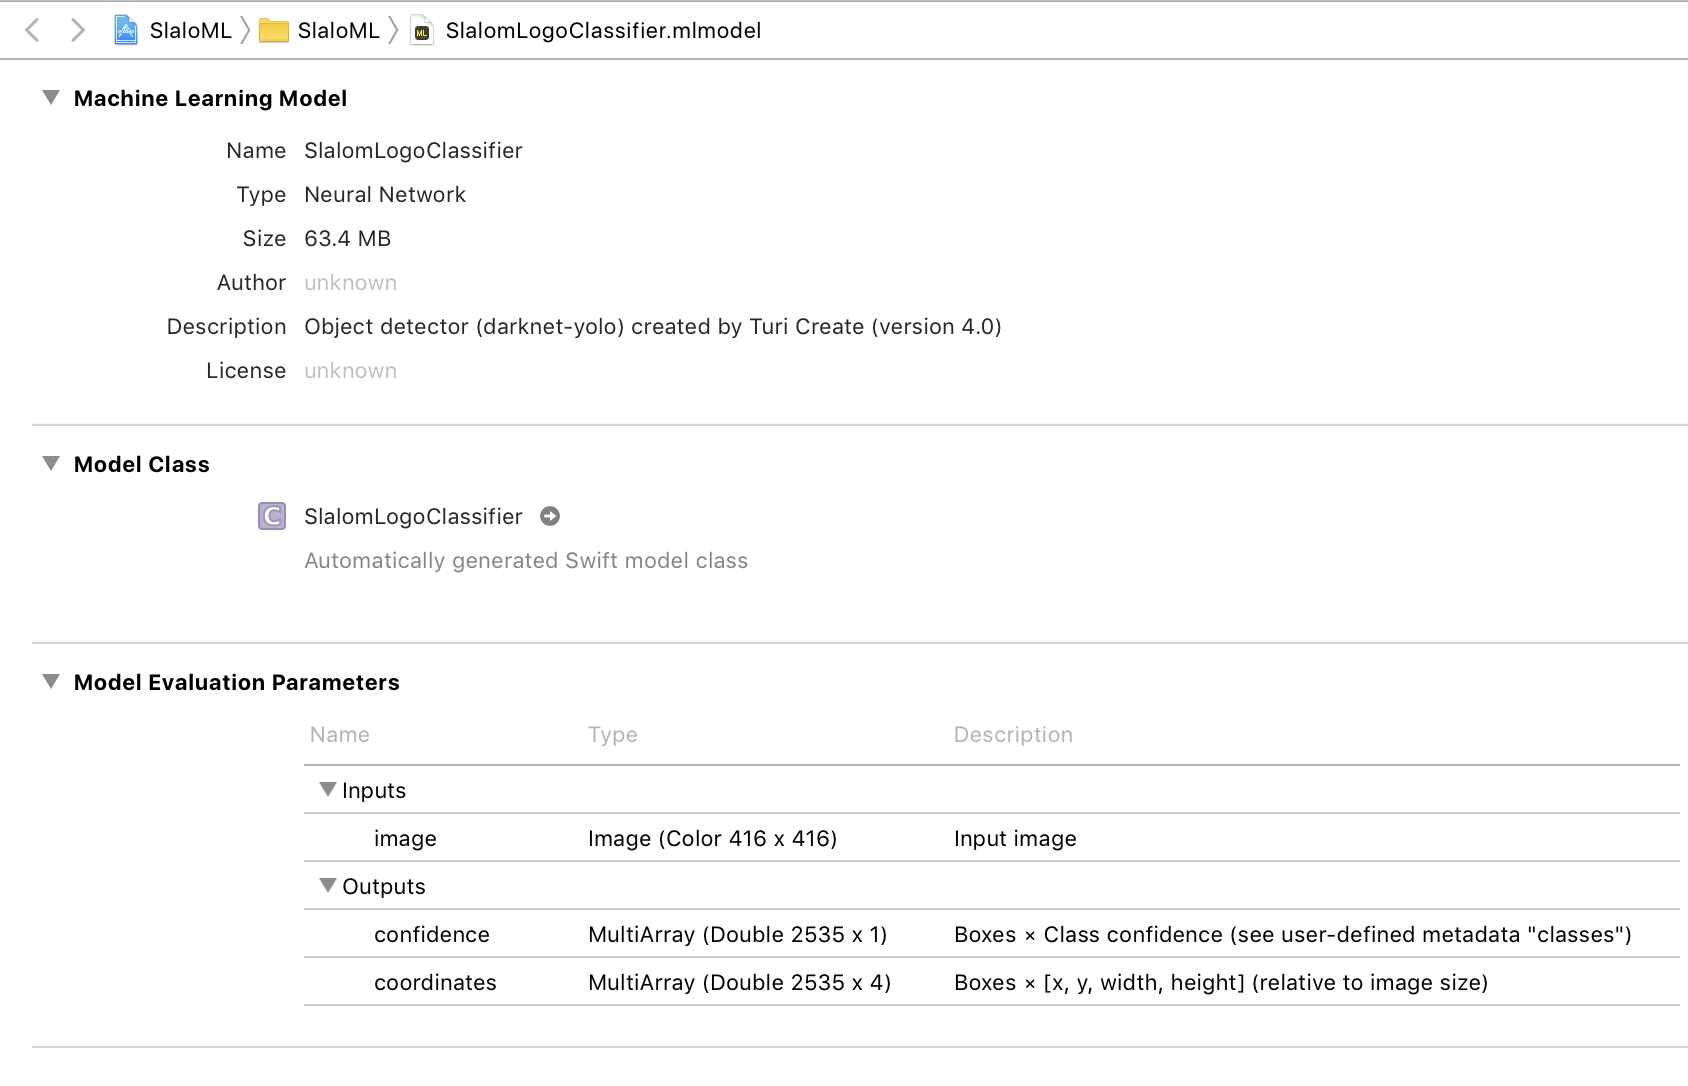 The CoreML model loaded into Xcode
This is our trained model in Xcode. It tells us how it was created, size, and more. Those blank fields can be updated using Apple’s CoreML tools – a command line tool to convert other machine learning models, but also edit the metadata for a CoreML model. It is not important to have this metadata to use this model.
The Model Class section is the autogenerated Swift code class that will be used to tell Vision what CoreML model it is using. In this instance it generated a SlalomLogoClassifier class.
Usage Details
We see in the Model Evaluation Parameters section that it takes an image as input, and outputs two arrays. One array is for confidence, how confident or accurate the model is in detecting our object, and the coordinates array is boxes of coordinates of where those objects could be. These are huge 2535 item arrays. Not all of the data that comes out of these arrays is used or actually finding an object. It is doing its best with the data it was trained with to find the object.
When we request our model to detect the object in our image, it comes up with many possible matches for our object. This could even be the same object just with slightly different coordinates. We want to go through our coordinates with a high enough level of confidence to display a visual indicator of the successful detection (a bounding box) around the object. Luckily there is code in the Advanced Usage section to do this heavy lifting for us (and is in my sample project).
If you really want to understand how all of it works, it is best to read about intersection-over-union (IoU) and how the overlaps of regions are used to predict the object. Turi Create also has a good section with visual examples in the Evaluation section.
Building an App
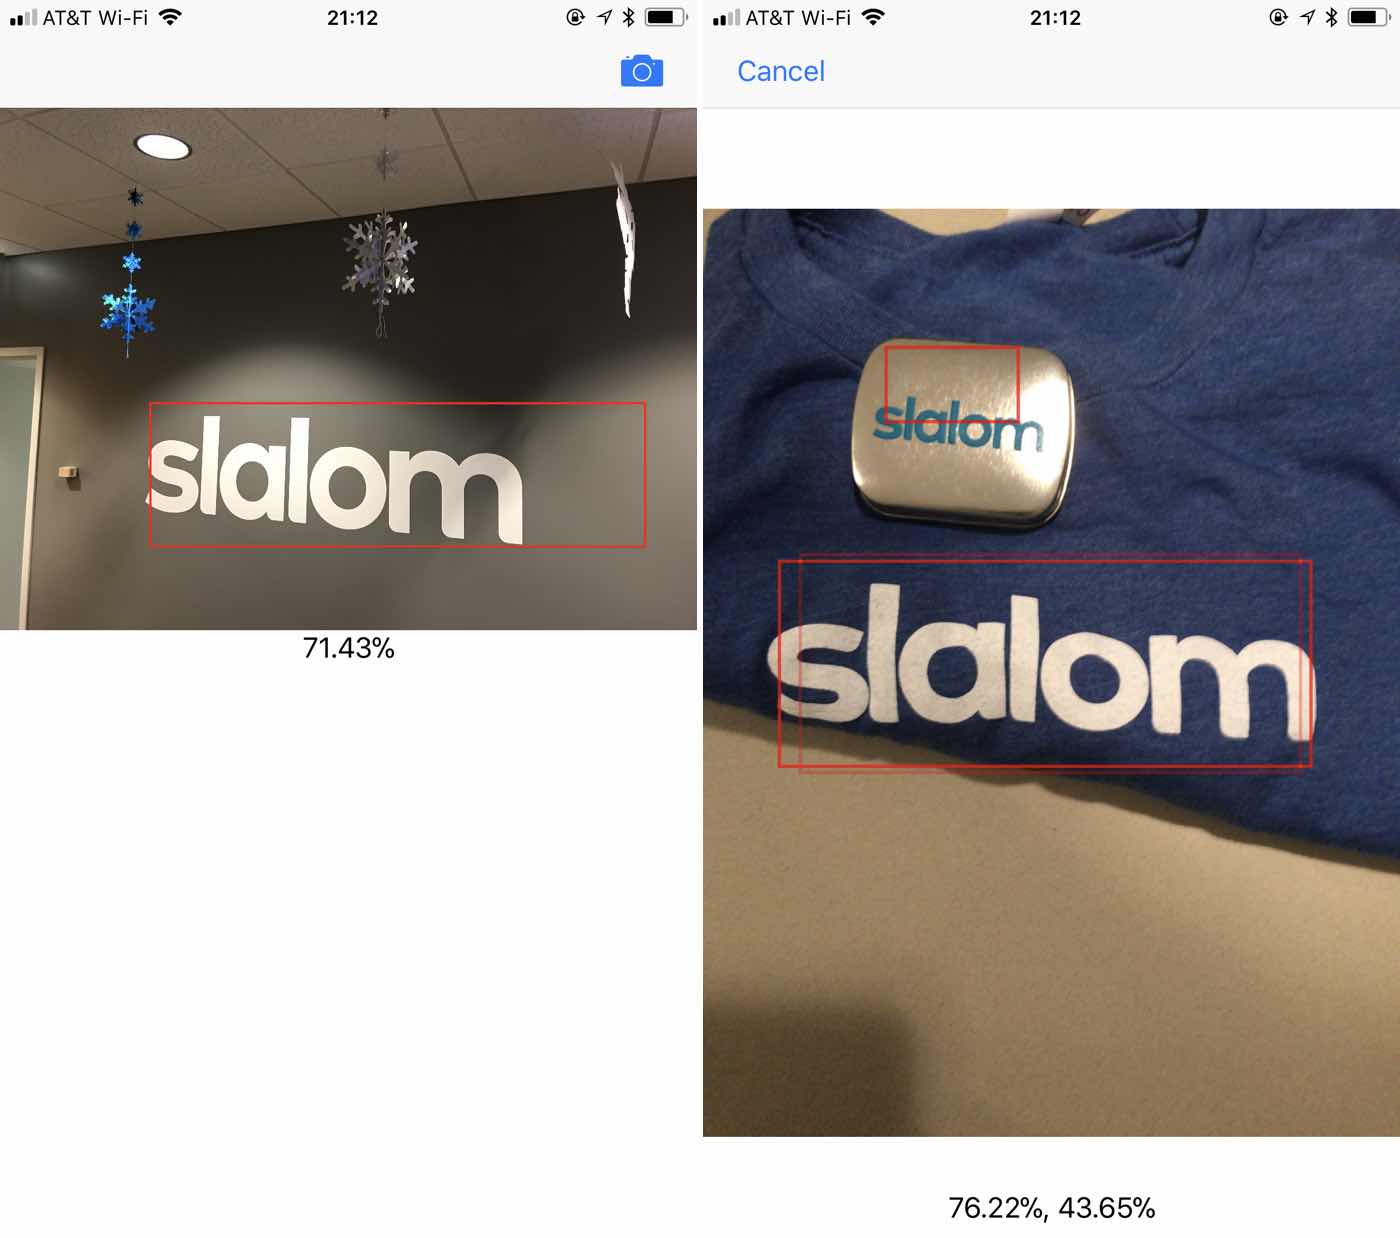
The basis of the demo app is simple, loads a jpeg in the project, detects, and draws a box around the detected object. It also has a button for a live camera via an AVCaptureSession that will detect the object in real time (if you have an iPhone 6 or greater) from the rear camera – also with a rapidly updating bounding box. Both areas also display the percentage of confidence in the detected object.
This Is How We Do This
- Load
UIImage, translate toCIImage - Create
VNCoreMLModelwith class generated from the trainedmlmodel - Create
VNCoreMLRequestwith the model performthe request on aVNImageRequestHandler, with the image- Handle the resulting data running it through Turi’s code to identify
confidenceandcoordinatesof detected objects - Draw visual indication of detected objects (if any)
Making the magic happen requires our loaded UIImage to be a CIImage which is passed to the Vision framework as a VNImageRequestHandler that performs requests on an array of VNCoreMLRequests, which is the actual Metal code that is set to the GPU for object detection processing for CoreML.
1
2
3
4
5
6
7
8
9
10
11
12
13
14
15
guard let ciImage = CIImage(image: image)
    else { fatalError("can't create CIImage from UIImage") }

// Proper orientation
let orientation = CGImagePropertyOrientation(image.imageOrientation)
inputImage = ciImage.oriented(forExifOrientation: Int32(orientation.rawValue))

let handler = VNImageRequestHandler(ciImage: ciImage, orientation: orientation)
DispatchQueue.global(qos: .userInteractive).async {
    do {
        try handler.perform([self.detectionRequest])
    } catch {
        print(error)
    }
}
The detectionRequest object we’re creating is a VNCoreMLRequest. It takes a parameter of a VNCoreMLModel which is an autogenerated class (SlalomLogoClassifier in this example) from our mlmodel, and a completion handler where we will use the provided Turi Create code to figure out where in the image the object was actually detected.
lazy var detectionRequest: VNCoreMLRequest = {
    // Load the ML model through its generated class and create a Vision request for it.
    do {
        let model = try VNCoreMLModel(for: SlalomLogoClassifier().model)

        return VNCoreMLRequest(model: model, completionHandler: self.handleDetection)
    } catch {
        fatalError("can't load Vision ML model: \(error)")
    }
}()
The handleDetection method then gets the results from the mlmodel. The results of this are different than some models you may get from the internet or convert on your own. This is giving us the array of confidence and coordinates. Then we send it to the reference code provided by Turi Create.
The algorithm is simple: Start by taking your highest-confidence prediction and add it to your final list of predictions. Check the IoU (see Evaluation) between it and and all the remaining predictions. Remove (or suppress) any prediction with an IoU above a pre-determined threshold (the nmsThreshold we extracted from the meta data). Repeat this procedure, now excluding predictions that you have already added or removed.
The code Turi Create provided I turned into a class method predictionsFromMultiDimensionalArrays on my view controller so it could also be used in the video detection, for the sake of simplicity.
1
2
3
4
5
6
7
8
9
10
11
12
13
14
15
16
17
18
19
20
21
func handleDetection(request: VNRequest, error: Error?) {
    let mlmodel = SlalomLogoClassifier()
    let userDefined: [String: String] = mlmodel.model.modelDescription.metadata[MLModelMetadataKey.creatorDefinedKey]! as! [String : String]
    nmsThreshold = Float(userDefined["non_maximum_suppression_threshold"]!) ?? 0.5

    guard let observations = request.results as? [VNCoreMLFeatureValueObservation]
        else { fatalError("unexpected result type from VNCoreMLRequest") }
    let predictions = ViewController.predictionsFromMultiDimensionalArrays(observations: observations, nmsThreshold: nmsThreshold)

    var strings: [String] = []
    if let predictions = predictions {
        for prediction in predictions {
            let pct = Float(Int(prediction.confidence * 10000)) / 100
            strings.append("\(pct)%")
            drawRectangle(detectedRectangle: prediction.boundingBox)
        }
    }
    DispatchQueue.main.async {
        self.classificationLabel.text = strings.joined(separator: ", ")
    }
}
I won’t add the box drawing code here, it simply draws a red box on the input UIImage with a red box using a UIGraphicsBeginImageContext and then outputs it. It should end up like image on the left in the example above.
Let’s Do This Live! 📹
With the basis of everything above under, we’ll now move it to video using the AVFoundation framework. This will be more about explaining the whole class, instead of each part of it, because it closely mirrors the the image detection, only replacing the source with CIImages from the AVCapture buffer.
This sets up the view and the AVCaptureVideoPreviewLayer which subclasses CALayer. This layer is what will be added as a sublayer to the standard UIView called cameraView later in the code.
1
2
3
4
5
6
7
8
9
10
11
12
13
14
15
16
17
18
19
20
21
22
23
24
25
26
27
import UIKit
import AVFoundation
import Vision
import CoreML

class CameraViewController: UIViewController, AVCaptureVideoDataOutputSampleBufferDelegate {
  // Connect InterfaceBuilder views to code
  @IBOutlet weak var classificationText: UILabel!
  @IBOutlet weak var cameraView: UIView!

  private var requests = [VNRequest]()

  // Create a layer to display camera frames in the UIView
  private lazy var cameraLayer: AVCaptureVideoPreviewLayer = AVCaptureVideoPreviewLayer(session: self.captureSession)
  // Create an AVCaptureSession
  private lazy var captureSession: AVCaptureSession = {
    let session = AVCaptureSession()
    session.sessionPreset = AVCaptureSession.Preset.photo
    guard
        let backCamera = AVCaptureDevice.default(.builtInWideAngleCamera, for: .video, position: .back),
        let input = try? AVCaptureDeviceInput(device: backCamera)
        else { return session }
    session.addInput(input)
    return session
  }()

  private lazy var classifier: SlalomLogoClassifier = SlalomLogoClassifier()
On viewDidLoad we set up the camera layer with the cameraLayer above. Then it sets up a running video capture session, sets the buffer delegate to this view controller, and allows this to be able to send those captured frames to Vision for processing.
1
2
3
4
5
6
7
8
9
10
11
12
  override func viewDidLoad() {
    super.viewDidLoad()
    cameraView?.layer.addSublayer(cameraLayer)
    cameraLayer.frame = cameraView.bounds

    let videoOutput = AVCaptureVideoDataOutput()
    videoOutput.videoSettings = [kCVPixelBufferPixelFormatTypeKey as String: Int(kCVPixelFormatType_32BGRA)]
    videoOutput.setSampleBufferDelegate(self, queue: DispatchQueue(label: "MyQueue"))
    self.captureSession.addOutput(videoOutput)
    self.captureSession.startRunning()
    setupVision()
  }
The setupVision() method, prepares vision with our CoreML model, much like the single image above, we set up a request for Vision to detect.
1
2
3
4
5
6
7
8
  func setupVision() {
    guard let visionModel = try? VNCoreMLModel(for: classifier.model) else {
      fatalError("Can’t load VisionML model")
    }
    let classificationRequest = VNCoreMLRequest(model: visionModel, completionHandler: handleClassifications)
    classificationRequest.imageCropAndScaleOption = VNImageCropAndScaleOption.scaleFill
    requests = [classificationRequest]
  }
The following code is very similar to the code from the image. Since the camera is updating with each frame, it didn’t make sense to draw a bounding box to a UIImage and update a view. Instead CALayers with an outline of the bounding box are added above the camera layer, and added and removed as the camera updates from our capture buffer. This is a more efficient way to show that dynamic bounding box.
Disclaimer: The box is not perfect. There is some box oddness between AVFoundation, Vision, and returning it all to a view that is not perfect. It does get the point across which is what this proof of concept is about.
1
2
3
4
5
6
7
8
9
10
11
12
13
14
15
16
17
18
19
20
21
22
23
24
25
26
27
28
29
30
31
32
33
34
35
36
37
38
39
40
41
42
43
44
45
46
47
48
49
50
  func handleClassifications(request: VNRequest, error: Error?) {
    let mlmodel = classifier
    let userDefined: [String: String] = mlmodel.model.modelDescription.metadata[MLModelMetadataKey.creatorDefinedKey]! as! [String : String]
    let nmsThreshold = Float(userDefined["non_maximum_suppression_threshold"]!) ?? 0.5

    guard let observations = request.results as? [VNCoreMLFeatureValueObservation] else {
      fatalError("unexpected result type from VNCoreMLRequest")
    }
    let predictions = ViewController.predictionsFromMultiDimensionalArrays(observations: observations, nmsThreshold: nmsThreshold)

    var strings: [String] = []
    if let predictions = predictions {
      for prediction in predictions {
        let pct = Float(Int(prediction.confidence * 10000)) / 100
        strings.append("\(pct)%")
      }
    }

    DispatchQueue.main.async {
      self.cameraLayer.sublayers?.removeSubrange(1...)

      if let predictions = predictions {
        for prediction in predictions {
          self.highlightLogo(boundingRect: prediction.boundingBox)
        }
      }
      self.classificationText.text = strings.joined(separator: ", ")
    }
  }

  func highlightLogo(boundingRect: CGRect) {
    let source = self.cameraView.frame

    let rectWidth = source.size.width * boundingRect.size.width
    let rectHeight = source.size.height * boundingRect.size.height

    let outline = CALayer()
    outline.frame = CGRect(x: boundingRect.origin.x * source.size.width, y:boundingRect.origin.y * source.size.height, width: rectWidth, height: rectHeight)


    outline.borderWidth = 2.0
    outline.borderColor = UIColor.red.cgColor

    self.cameraLayer.addSublayer(outline)
  }

  override func viewDidLayoutSubviews() {
      super.viewDidLayoutSubviews()
      self.cameraLayer.frame = self.cameraView?.bounds ?? .zero
  }
Here is our delegate method to the AVCaptureVideoDataOutputSampleBufferDelegate method. It sends directly to Vision via the same VNImageRequestHandler we used before, except this time it is sending the pixel buffer directly from AVCapture. It uses the requests we set up in viewDidLoad.
1
2
3
4
5
6
7
8
9
10
11
12
13
14
15
  func captureOutput(_ output: AVCaptureOutput, didOutput sampleBuffer: CMSampleBuffer, from connection: AVCaptureConnection) {
    guard let pixelBuffer = CMSampleBufferGetImageBuffer(sampleBuffer) else {
      return
    }
    var requestOptions:[VNImageOption : Any] = [:]
    if let cameraIntrinsicData = CMGetAttachment(sampleBuffer, kCMSampleBufferAttachmentKey_CameraIntrinsicMatrix, nil) {
      requestOptions = [.cameraIntrinsics:cameraIntrinsicData]
    }
    let imageRequestHandler = VNImageRequestHandler(cvPixelBuffer: pixelBuffer, orientation: CGImagePropertyOrientation(rawValue: 6)!, options: requestOptions)
    do {
      try imageRequestHandler.perform(self.requests)
    } catch {
      print(error)
    }
  }
The last step is to be sure the capture session stops running as the view controller is dismissed.
1
2
3
4
5
  @IBAction func dismiss(_ sender: Any) {
    captureSession.stopRunning()
    navigationController?.dismiss(animated: true, completion: nil)
  }
}
The methods have changed slightly, however the process is the same. Set up requests for object detection and then send the image(s) directly to Vision for processing, and then draw the bounding box. Once this is all set up, it provides the ability to train a model and do object detection on your own machine, without having to pay a cloud provider for the service to train. It makes setting up a model for CoreML incredibly easy to do at home.
I had fun with this project. Slalom (my current employer) allowed me to do some work while I was waiting to start a project. I definitely learned a lot and hope to integrate some CoreML in future projects.
All the code for this project can be found in my GitHub repository.
Software versions used at the time of writing: Xcode 9.2 and Turi Create 4.0.